AdSense

Thursday, January 29, 2015

How to Add a Drawer to a Nightstand & Create Faux Mirror Using Mylar


This is the story of a pair of nightstands kindly given to us by my sister's in-laws when we were furniture-less. They are very sturdy. Why get rid of something so functional?


A few years ago, I painted them both white.


There were still two problems: 1) The open space often looked cluttered with stuff I needed to store and, 2) I didn't like the groove handle on the front of the drawer.

It wasn't until a few weeks ago that it hit me--I could add a second drawer to hide the stuff stacked in the open space and give the nightstand a cleaner look.

I removed the drawer and started to examine the structure inside. Instead of removing the existing frame and building a new one, I decided to just add pieces on using my nail gun since I didn't want to rip apart what was already in place so tightly.


I used an extra piece of 1x2 as a guide to help place the piece for the drawer glide.


Next, I needed to build a drawer. I measured the open space and it was 9". Then I considered the 1/4" plywood I would put on the bottom, the 1/4" I'd need for drawer slide clearance, and a 1/4" space on top between the drawers. I decided to make the drawer 8.25" tall. I used the top drawer as a guide for how wide and deep it needed to be.


Then I removed the drawer face from the top drawer. I figured I would use the same material for both drawers and could finally get rid of the grooved handle.

I wound up using MDF scraps for the face, ripped it down to size and reattached it to the drawer using pocket holes.

I attached the drawer glides to the new drawer and put it in place with the top drawer so I could measure how big to make the face front for the new drawer.


I also made sure to drill the knob holes
Yay it opens!

Then came the awesome idea I got after seeing some Glamorized Nightstands from Bachelors Way where she used mirrored contact paper! Gasp! I love mirror furniture, but I hate working with real mirrors. I think my family would be too rough for the contact paper too since it looks like it might scratch easily, so I decided to use Heavy Duty Reflective Mylar (affiliate link) This is the stuff they use in greenhouses to absorb heat. It's a big roll, so it can be used for many other projects too.


I rolled it out and traced the drawer fronts on them. I cut it out minus 1/8" all the way around.


I used a staple gun to secure the corners in place, but it laid really flat and probably would have been fine without it.


Then I nailed on some molding trim that I cut to frame the drawer front and had already pre-painted. Just a note about cutting thin molding like this, it's a pain to cut on the miter saw because it's so powerful that if your cut is too close to the edge it will split and break it into jagged pieces. I cut these pieces with a miter box and hand saw. I found it much easier to be precise with the length this way too.

I carefully taped the open seams so I could caulk it. Then I touched it up with some paint around the edges.


I was a little worried about puncturing the mylar to put the knobs in, but I was very careful and it didn't rip beyond the holes.


I LOVE IT!!! Now I just need to do this to the other nightstand.

Linking up to: 
http://www.myrepurposedlife.com/2015/01/catch-as-catch-can-198.html?utm_source=feedburner&utm_medium=feed&utm_campaign=Feed%3A+blogspot%2FPgMj+%28My+Repurposed+Life%29


http://www.bedifferentactnormal.com/2015/01/show-tell-saturday-13115.html?utm_source=feedburner&utm_medium=feed&utm_campaign=Feed%3A+BeDifferentactNormal+%28Be+Different...Act+Normal%29

http://diyshowoff.com/2015/02/01/diy-party-36/?utm_source=feedburner&utm_medium=feed&utm_campaign=Feed%3A+blogspot%2FpuSM+%28DIY+Show+Off%29


http://www.domestically-speaking.com/2015/02/inspire-monday-45.html
http://www.notjustahousewife.net/2015/02/february-linky-party.html

http://www.remodelaholic.com/2015/02/white-painted-projects/

http://www.funkyjunkinteriors.net/2015/02/pj-266-upcycled-link-party.html?utm_source=feedburner&utm_medium=feed&utm_campaign=Feed%3A+blogspot%2FKCcu+%28Funky+Junk+Interiors%29

Monday, January 26, 2015

Valentine's House Tour


After having an abundance of Christmas decor around my house for the past two months, it feels good to have just a few hints of Valentine's.


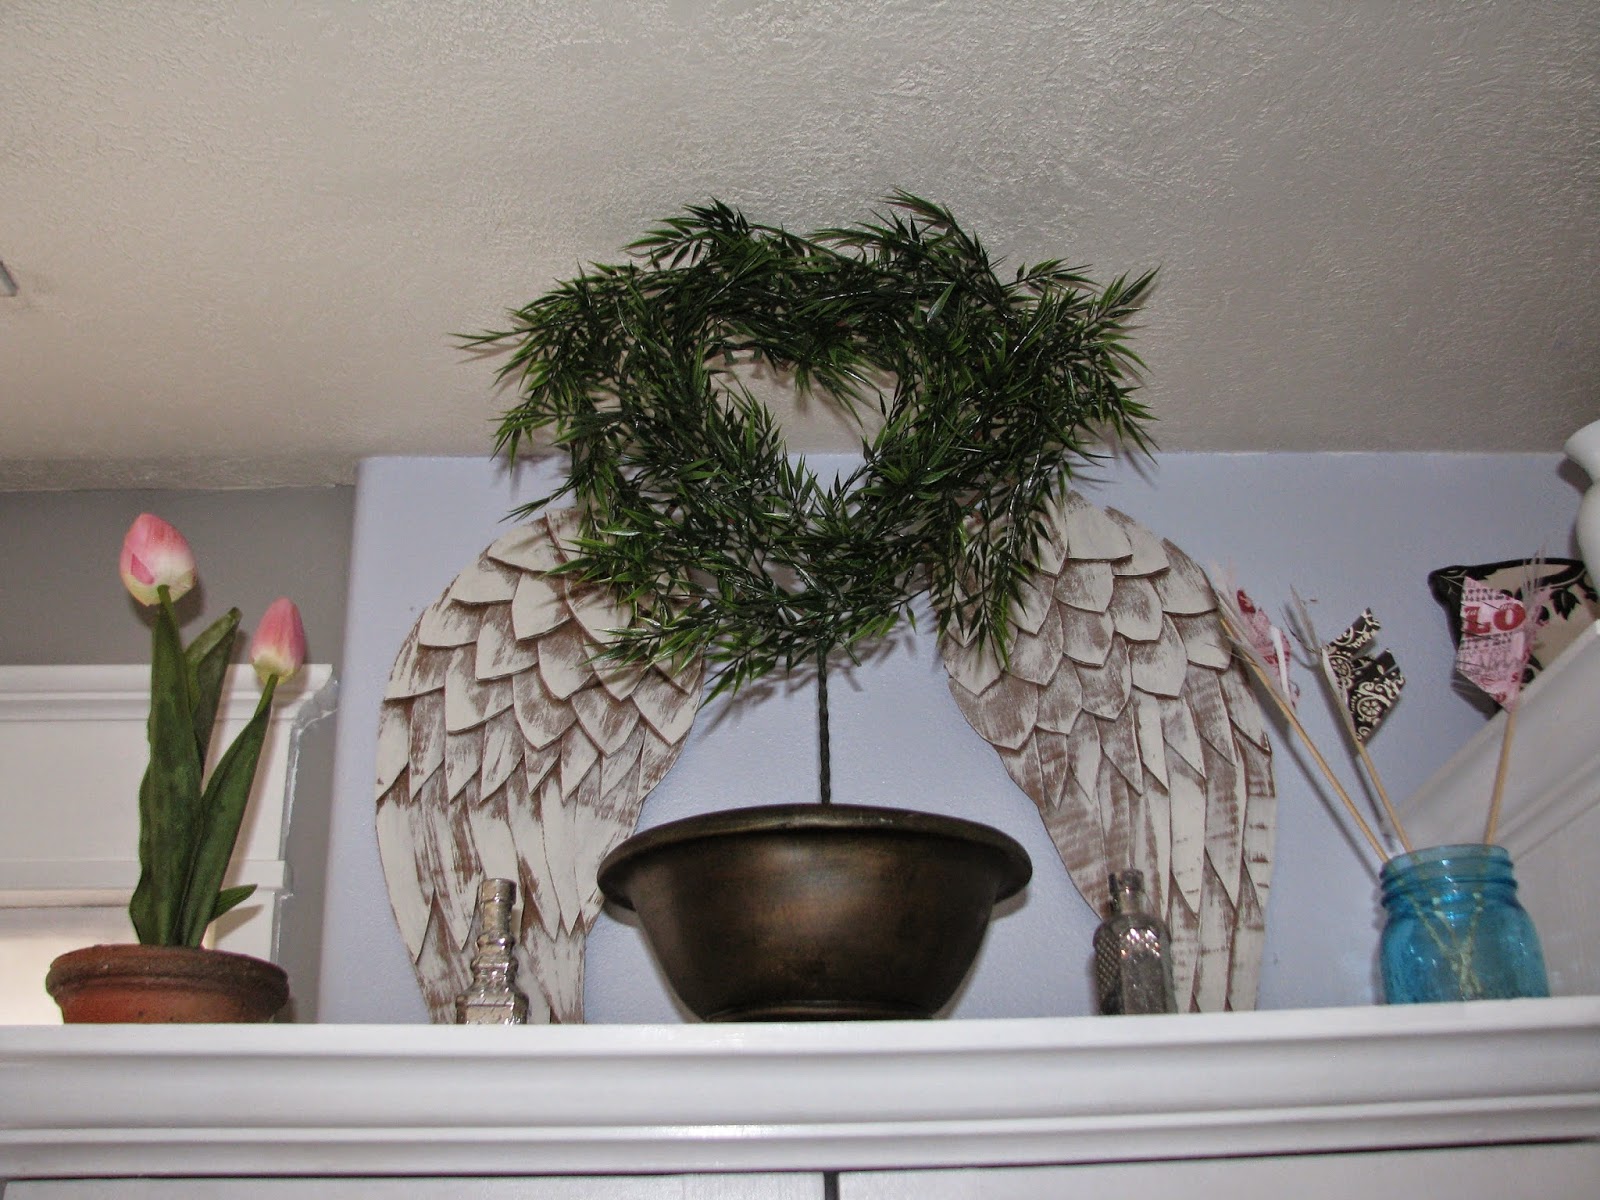
* The angel/Cupid wings on the wall are made out of cardboard. I cut out the wings and then cut out feathers to hot glue and layer on top. I finished them by dry brushing white paint on top
* The mercury glass bottles were Christmas ornaments from Target that remind me of love potion
* The faux pink tulips are from Tai Pan Trading
* The arrows were a Pinterest project using craft paper and wooden skewers
* The heart topiary was a DIY project using a cheap topiary from Wal-Mart, a leafy garland from Hobby Lobby, floral tape, floral wire, and a thrift store pot


* The Vintage Valentine was a free clip art from Vintage Holiday Crafts
* The free Bee Mine printable was from Entirely Eventful
* The Mr. Darcy plate was another fun Pinterest project using my silhouette machine to cut the vinyl.


* The glitter heart ornament is from Hobby Lobby
* I made the white frame out of MDF scraps left over from reframing my doors and windows. The frame was inspired by Shanty 2 Chic's ornament frame

Happy Valentine's decorating! 

Linking to: Domestically Speaking Inspire Me Monday 44

Monday, January 19, 2015

Tiling Backsplash in a Bay Window with Rounded Corners


I really wasn't sure how tiling back splash would work in this space with the bay window. How would I deal with the rounded corners? Should I keep the tile the same height all the way around the windows? 

I started working from the right to left and kept it low behind the sink with the idea that I might bring it up higher.


But, I liked it how it was, just to the window. If I took it up further, I'd be dealing with cutting the small tiles even smaller to fit around molding and curves in the wall, which would make it challenging to keep them from cracking. And, the walls and windows were not very even or similarly level.


Also, the corners where the tile met up had a gap since the rounded corner was turning into a sharp one. This meant there would be a lot of adhesive filler, but it seemed easier to maintain if it stayed shorter than if it went all the way up to the cabinet. 

Since this meant the end of the tile would be visible, any pieces that were cut, I took off the mesh and flipped them around so the finished part was visible instead of the cut part.


There also was a bit of a gap in this area between the counter top and the wall, which it why the caulking line is so thick here.


I like it and I guess that's all that matters! See the rest of my Kitchen Reveal here!

Monday, January 12, 2015

Resize Your Existing Cabinet and Doors to Fit an Apron Front Sink


As part of our kitchen makeover, we had to take out our old sink and adjust the cabinet to fit our undermount apronfront sink before they could template the granite counter tops. I knew this would be a process (involving not having a sink for several weeks). The cabinet had to be cut and reinforced so the new sink would be level with the cabinets, and then the new counter tops would rest on top.

Fireclay sinks are all slightly different, so there was no standard template. First things, first. My husband undid the plumbing and removed the sink. Then small humans kept appearing in the opening. 


We went ahead and cut through the laminate counter top on each side so we could drill through both sides of the cabinet and access the dishwasher hoses. Then I removed the doors and drawer fronts.


Next came some measuring. I measured the sink and fortunately it was 33"--the exact measurement to the vertical pieces of the side. Then I measured how tall it was and marked on the cabinet accordingly.


  Cut down with my multi-tool


Then I added some pocket holes so I could attach the top piece.  (The sides of the top piece already had pocket holes in them).


Next, my husband added all kinds of reinforcements (probably more than necessary). He put some 1/2" plywood on each side so the sides of the sink would be tight against the cabinet. Then, along the bottom where the sink would rest, he put another strip of plywood. He also put supports along the back to help hold the cabinet together. Since we have space on the sides because of the bay window shape, he even put 2x4s on the outside of the cabinets that go all the way to the floor.

He built the back out so the sink would flat against it. He later had to cut a hole in the middle so there wold be room for the faucet and plumbing.


Here is the sink nice and snug in the cabinet. Our sink was 140 lbs and between the two of us, it was quite manageable to lift the sink in and out when we needed. (Not a one person job).


We were able to hook up the dishwasher hoses while we were without a working sink. Eventually we cut a hole lower in the left side of the cabinet to pull them through.


Here it is in it's under mount glory!

 
Next I cut down the cabinet doors. I measured how tall I needed them to be for the new openings. I cut the bottom just on top of the routed part.


Then I cut out how much it needed to be shortened.


Then glue and clamp together. Since the wood was heavy I added a pocket hole in the middle and on the side opposite where the hinges would go for a little extra strength.


You can see on the back how the holes for the hinges are pretty close to the cut. I chiseled a little and they popped back in easily.


Then I did some sanding, wood filling, and more sanding to smooth them out a bit. I primed and painted.


The sander got a little crazy on the right door, but honesty, no one really looks down that low when they're in the kitchen.

 
The whole thing was basically free since we used wood scraps from our garage. 

Linking to: Domestically Speaking